Mobile Application Introduction
The ExoHome™ mobile application provides an extensive set of features for a product’s user experience, including but not limited to device controls, scheduling, provisioning, group management, family sharing, and user account management.
This document provides a visual reference for the ExoHome™ user application experience.
Mobile Application Customer Journey
- Downloading the App
- Creating an Account
- Adding a Device
- Controlling Your Device
- Creating Schedules
- Adding Guests with Family Sharing
- Managing Devices with Groups
- Additional Screens
- Logging Out and Signing In
Downloading the App
To begin using your product, users will first need to download the Android or iOS mobile app to create an account and add their product. After completing the Porting the Mobile Application tutorial, you will have an iOS and Android application publicly available through their respective App stores.
We recommend your product’s packaging include a reference to the app name and/or a link for your users to easily find the applications.
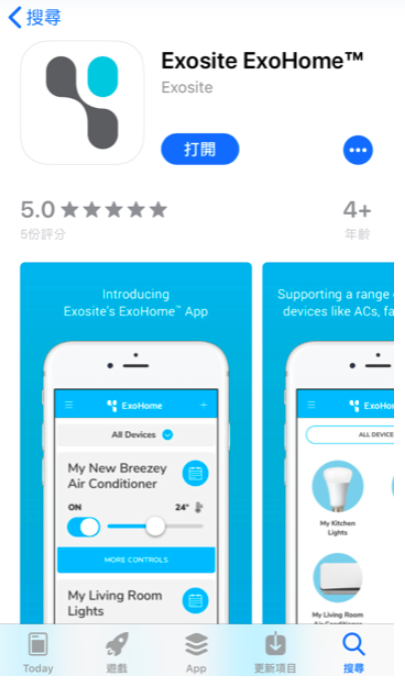
App Store Example
Requirements
- Android or iOS mobile phone
- Minimum Android 10.x (SDK 29)
- Minimum iOS 15.x
Creating an Account
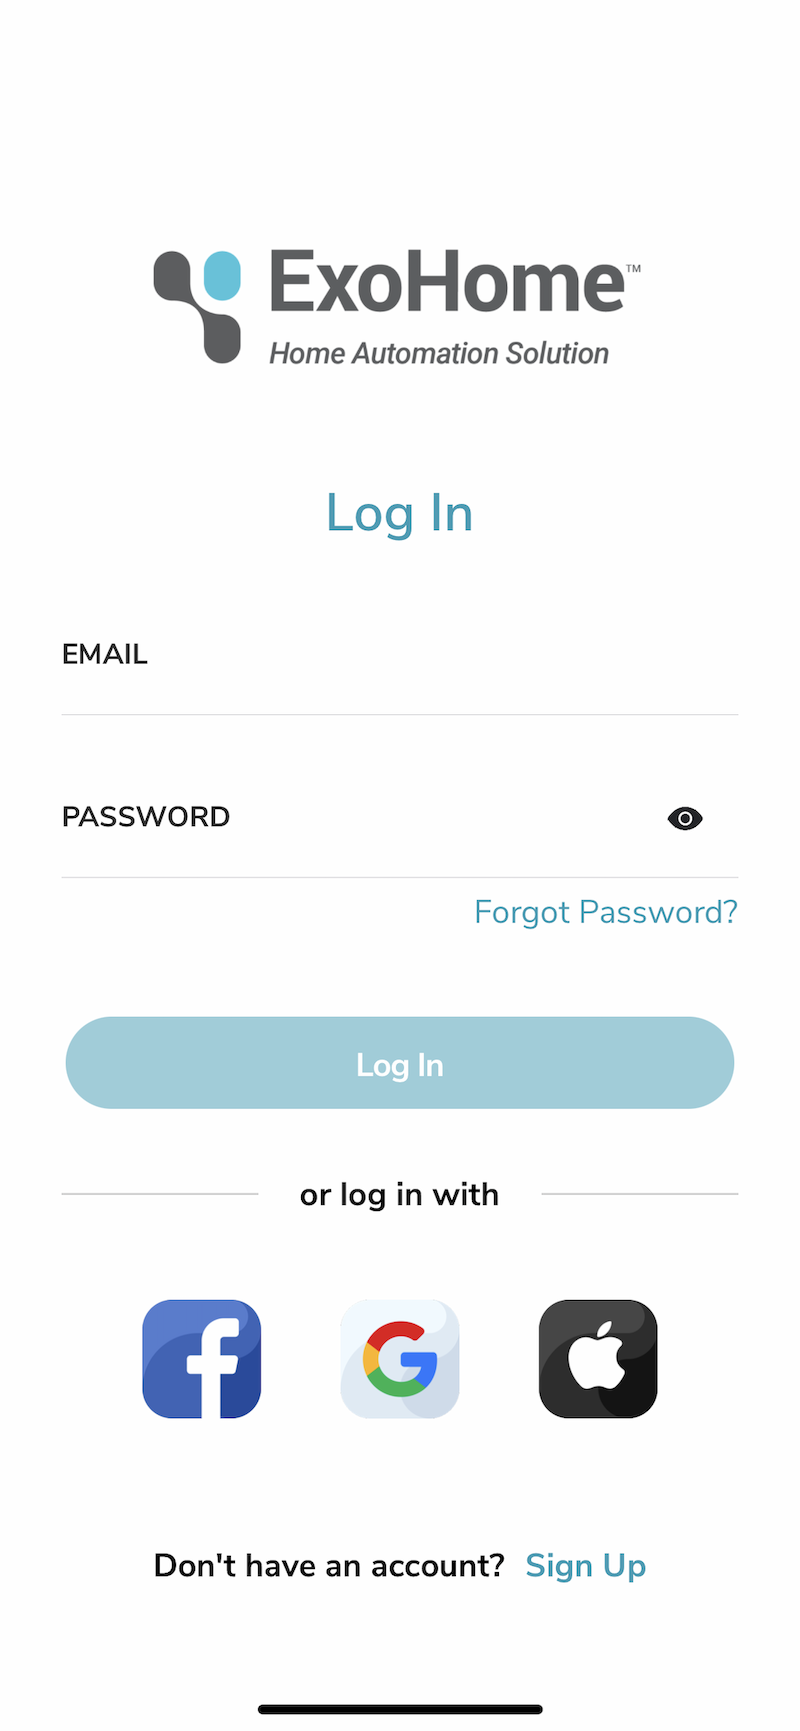
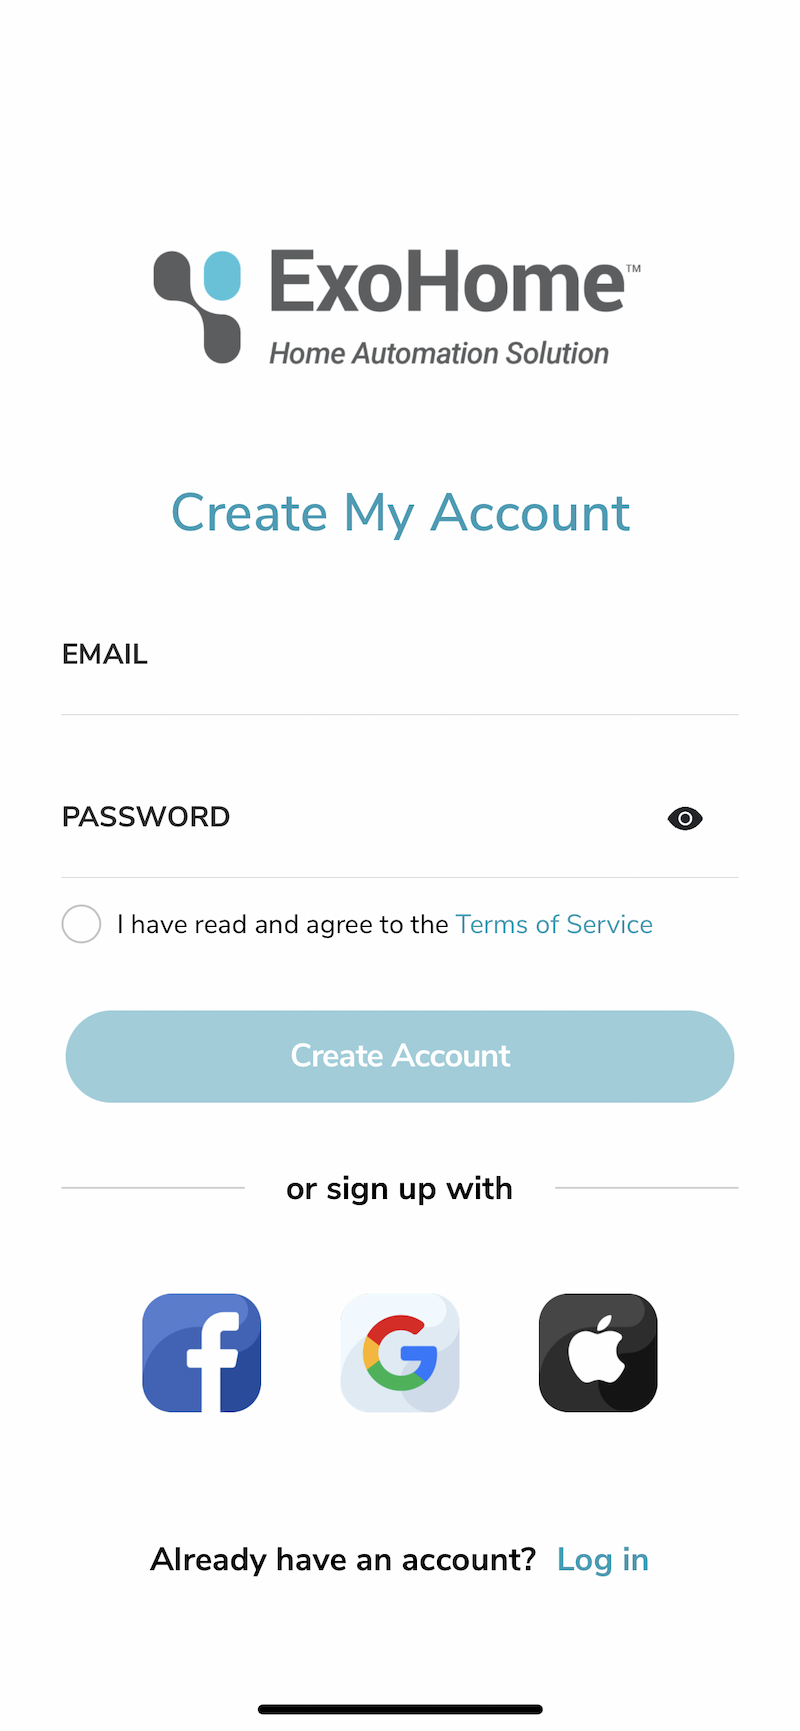
Start and Create Account screens
Before a user can interact with your product device and the connected features of the mobile application, they must first authenticate by creating an account or connecting with their Facebook, Google account, or Apple ID.
The ExoHome™ includes a number of screens for signing in, creating an account, welcome email and landing page templates, and resetting an account password.
Start Screen (iOS):
Create Account Screen (iOS):
Notes
- Password rules for email sign-up: Min. 8 characters - Max. 20 characters
- 'Create Account' => links to 'Add Device Step 1' (after account is created)
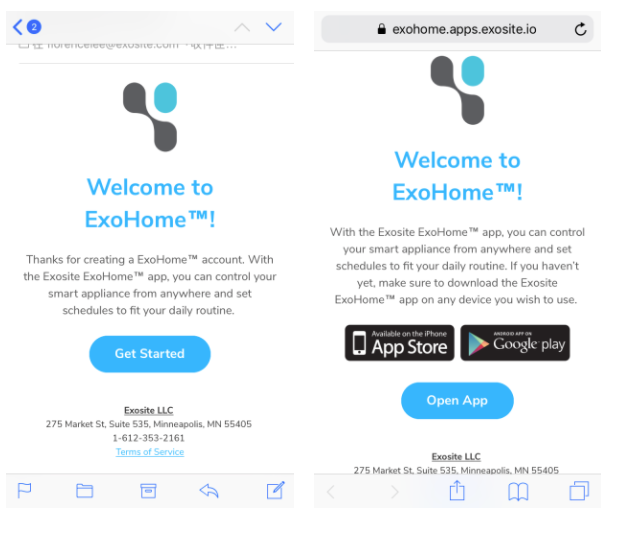
Welcome screens
Once a new account is created, a welcome email is sent out to the user. For email registration, users need to click 'Confirm' button in the email to activate the account. However, for registration via Facebook, Google account, or Apple ID, users will receive the welcome email without needing further confirmation.
A basic welcome email template is provided, which should be customized to fit any messaging, content, and branding needs (company logo, brand color, and any brand typeface).
Welcome Email and Landing Page Template:
Adding a Device
Steps
1. Connect to your device
When adding a new device, users will first need to connect to the device's access point (AP). There are two methods to connect to the device's AP:
A. Use QR code scanning (default). Or
B. Look for the available Wi-Fi list in the phone. Click 'From List' button to next page, it guides users to their OS settings screen (iOS users) or brings up the available Wi-Fi list in the app (Android users).
Steps to Add Device
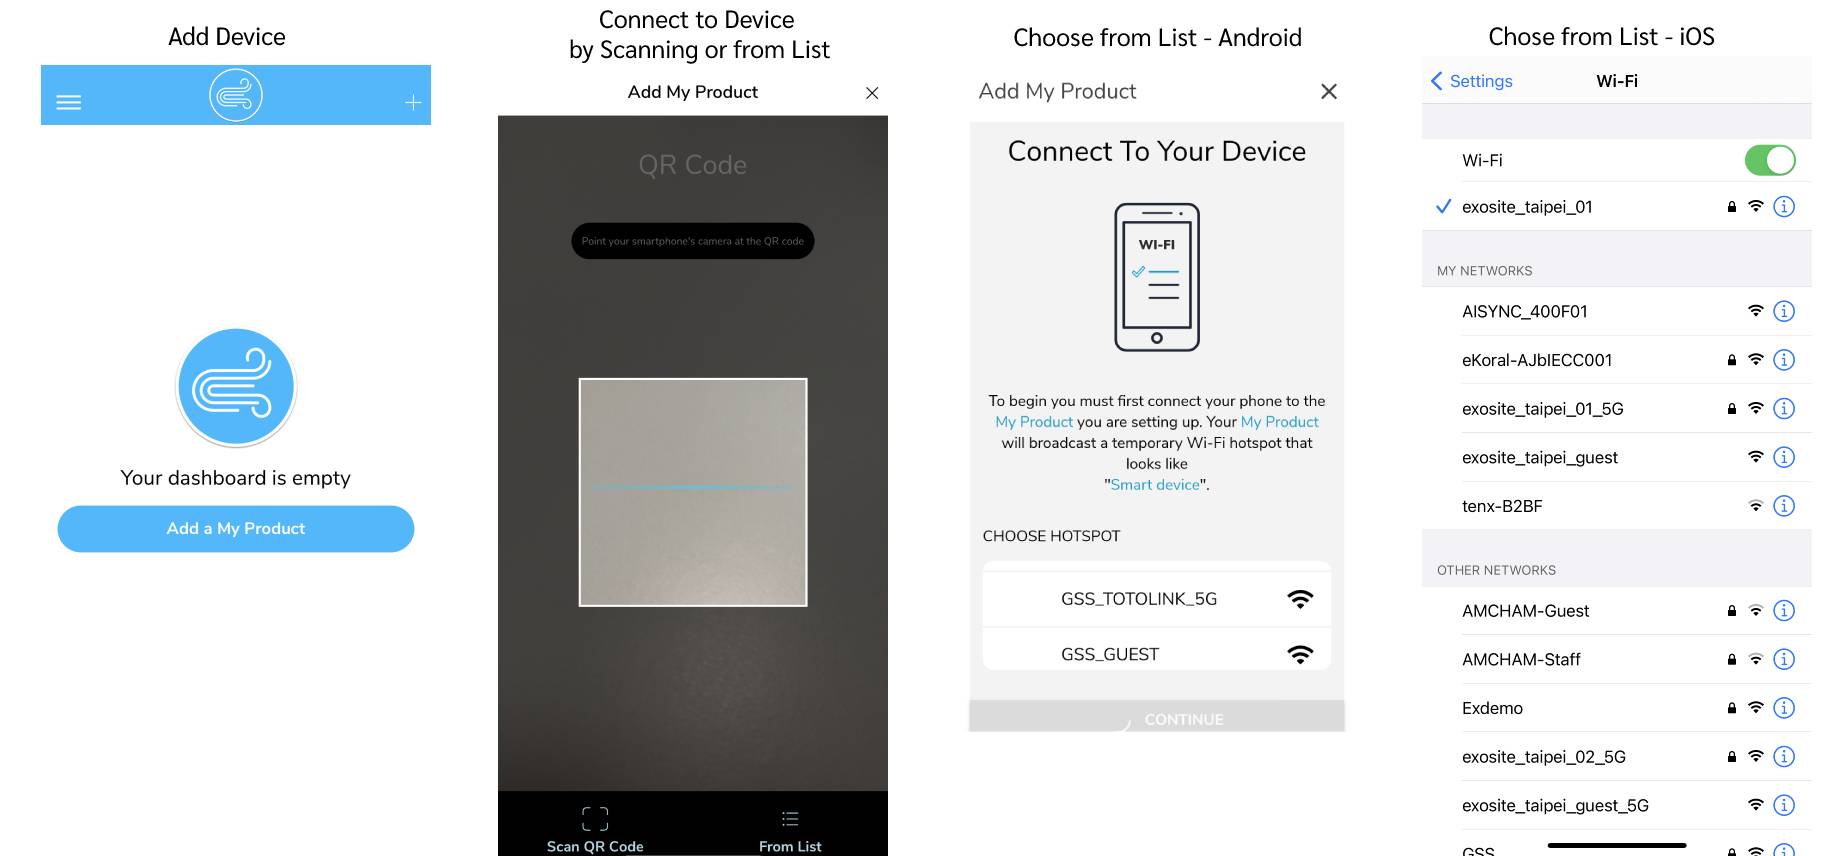
Once connected, the 'Continue' button in the app will be highlighted, allowing the user to proceed.
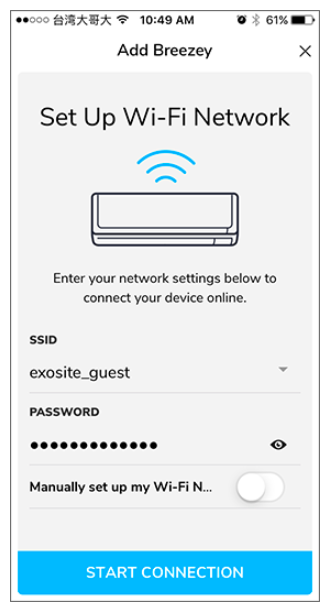
2. Set up Wi-Fi network
On the next screen users will set up their device’s network settings, entering in their network's SSID and password. Users also have the option of toggling a manual network setup mode, if needed.
Set Up Wi-Fi Network Screen:
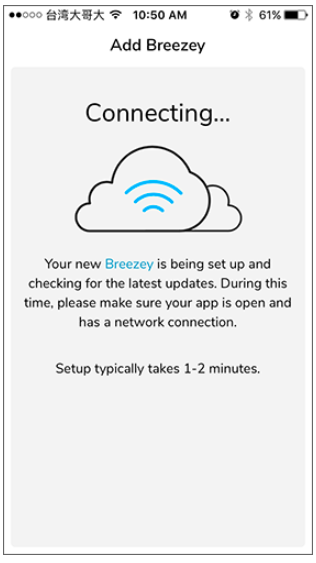
3. Provisioning (Loading)
After clicking 'Start Connection', the user's device will start the provisioning process and then wait for a response from the mobile app. This process is typically less than 1 minute, and will timeout after 90 seconds in case the user’s network or settings has any issues.
Provisioning Loading Screen:
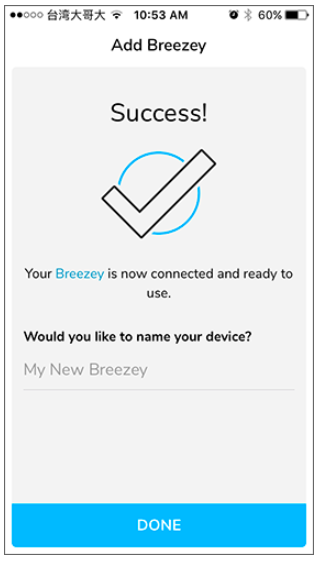
4. Provisioning Done (Success)
After successfully adding a new device, a user can give it a new display name. If no name is given, a default name is applied based on the Product’s name using the pattern 'My New + Product Name'. Clicking 'Done' will bring the user back to the 'Home Dashboard' where their new device would now be available.
Provisioning Success Screen:
4b. Provisioning Done (Failed)
If the provisioning process failed, the user will see a message notifying them of the issue. They may then retry the process to work through any network or mobile connection issues.
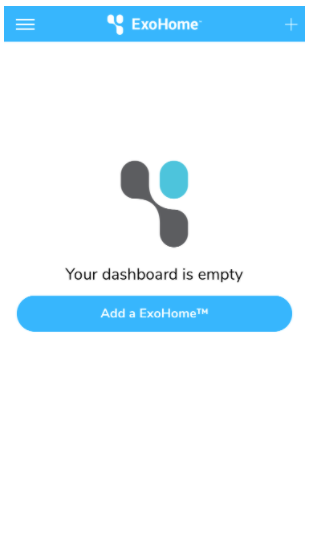
Home Dashboard (Empty)
If a new user doesn't add any devices or they remove all their existing ones, the 'Home Dashboard' will display an empty state with a call to action to add a device.
Home Dashboard - User with No Devices Example:
Controlling Your Device
Home Dashboard
The 'Home Dashboard' is the default screen a user sees after logging into the application and lists the devices and device groups owned or shared to the user. From here a user can manage their device settings and start the flow for adding new devices.
Home Dashboard Example:
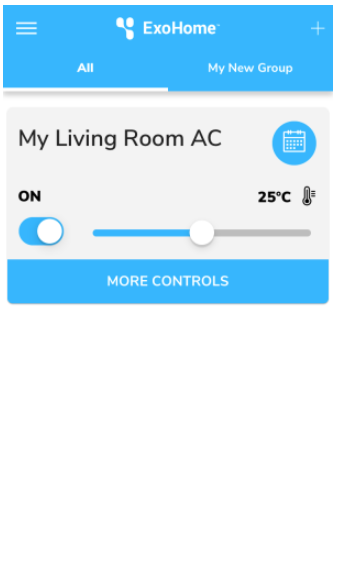
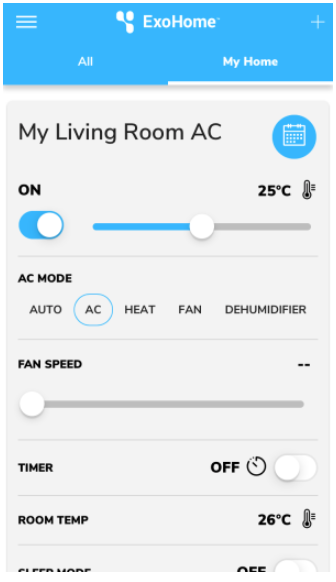
Device Popit
Devices on the Home Dashboard are represented with a compact, feature-focused interface, which we call a 'popit'.
As an example, a popit for a HVAC device would display a...
- 'Power' control
- 'Temperature' control
- 'Schedules' button
Device Popit Example:

When designing what goes into a popit, your primary features should be carefully selected based on your users' needs, as demonstrated with the HVAC example above.
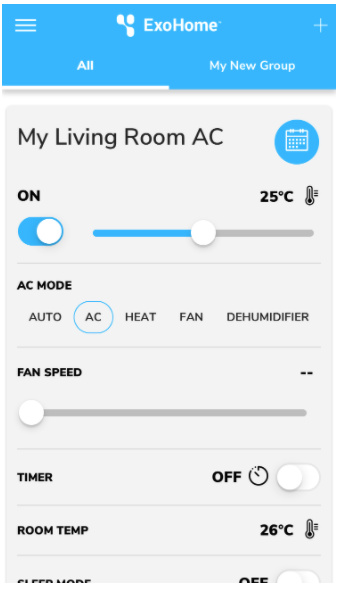
Expanded Device Popit
Popits also expand to reveal secondary features such as different control modes, device settings, and family sharing. For iOS users, some control functions can be added to Shortcuts APP and ask Siri to control your device. The expanded area is great for capturing all of your product’s capabilities while making sure your primary user flow is quick and intuitive to use.
When expanding a popit, or group popit, users stay on the 'Home Dashboard'.
Expanded Device Popit Example:
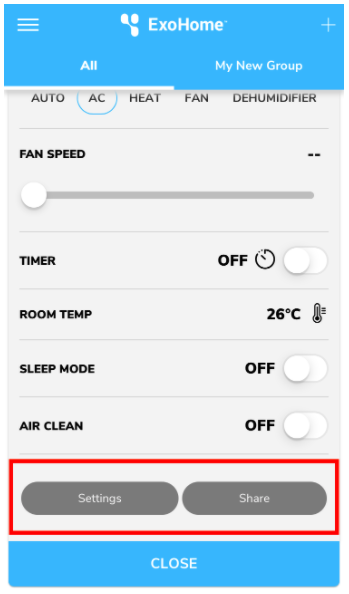
Button links to the 'Device Settings' and 'Family Sharing' screens are located at the bottom of the popit.
Device Settings and Family Sharing Links (Android):
The Shortcuts Links (iOS):

Creating Schedules
Schedule List
Schedules allow users the flexibility to manage their devices’ activity automatically by defining when and how their product should behave. Users can create and manage their devices' schedules from the 'Schedule List' screen, which is accessible from a device popit.
Schedule List Screen (links from Device Popit):
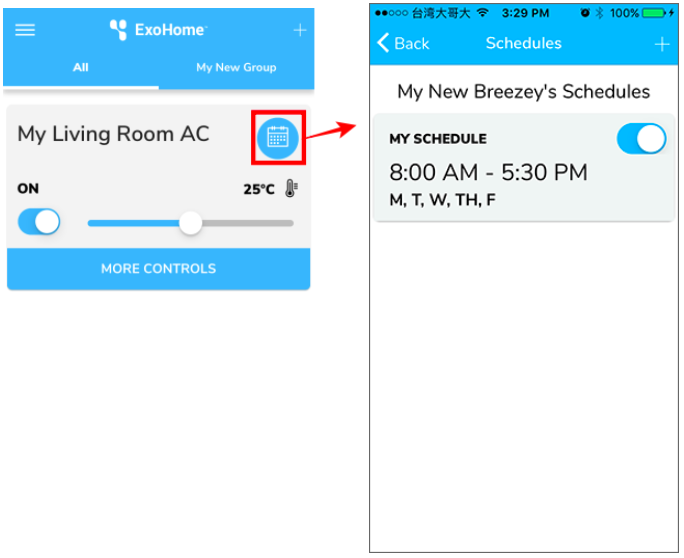
Clicking on a schedule from the list will open the 'Edit Schedule' screen, where as, clicking the upper hand plus sign will open the 'Create Schedule' screen.
Notes
- Users can toggle schedules off and on from the schedule list.
- Up to 10 schedules can be added to a device. (The number of schedules varies according to hardware and schedule design.)
- Schedules are stored per device and shared across all users.
- Schedule's time format (12H or 24H clock) can be set in the App's Settings → My Account page → Time format.
Creating / Editing a Schedule
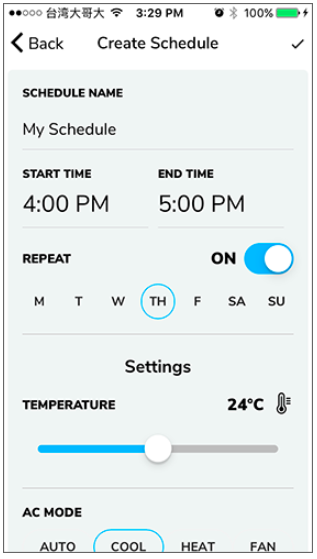
When creating or editing a schedule, a user will define the…
- Schedule name
- Schedule start and end time
- Repeat behavior
- Property settings, for example, setting temperature to 24°C and mode to cool
Create Schedule Screen:
Notes
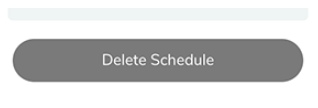
- The 'Editing Schedule' screen has an additional delete button at the bottom.
Managing Device Settings
The device settings area contains additional properties that users may need to manage on an infrequent basis, such as their device’s name or software version. Users access this screen from the bottom of the expanded popit state.
Device Settings Screen:
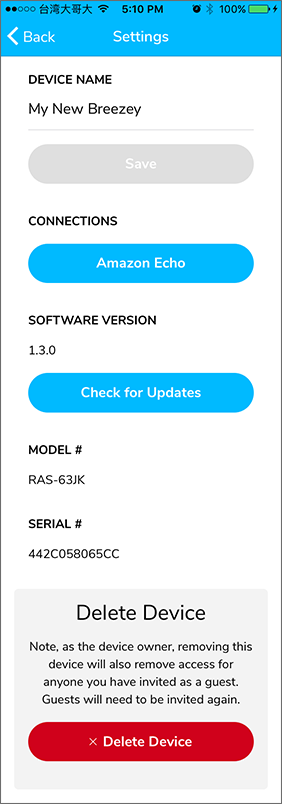
A user can...
- Change the device name
- Perform over-the-air software updates (owner role only)
- View model # and serial # (owner role only)
- Delete the device (triggers a confirmation alert)
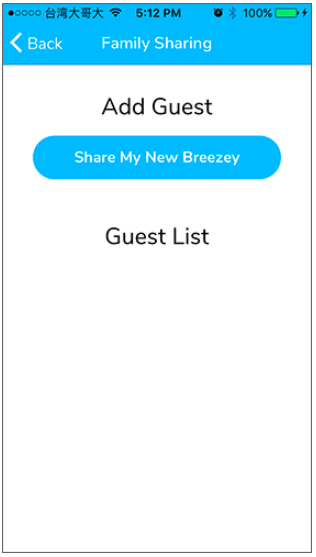
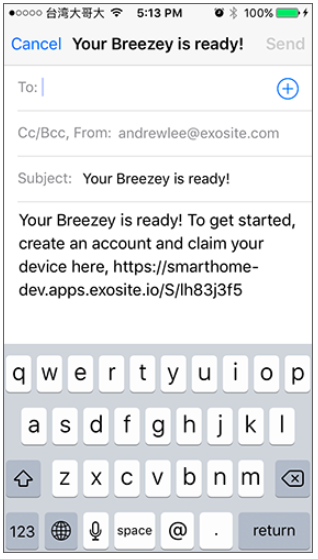
Adding Guests with Family Sharing
With the ExoHome™’s family sharing, owners can share their devices with up to 10 family members and friends which provides them controlling, scheduling, and group management access. Owners can access these settings from the bottom of the expanded popit state.
Family Sharing Screen:
Sharing Message by Email Example:
Managing Devices with Groups
Group Tabs and Group Popits
Groups allow users the flexibility to control multiple devices at once, in a similar fashion to controlling a single device. Any properties that are shared between all devices in the group are displayed.
Once a user has 1 or more groups created, a groups tab navigation will display at the top of the 'Home Dashboard'.
Groups Tab Example:
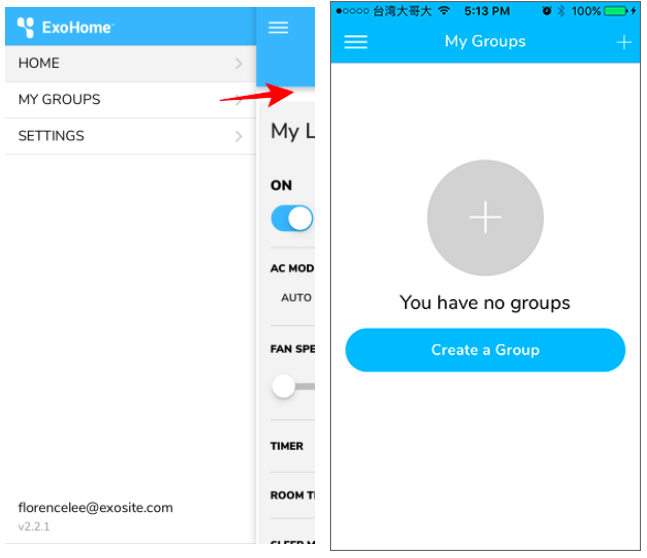
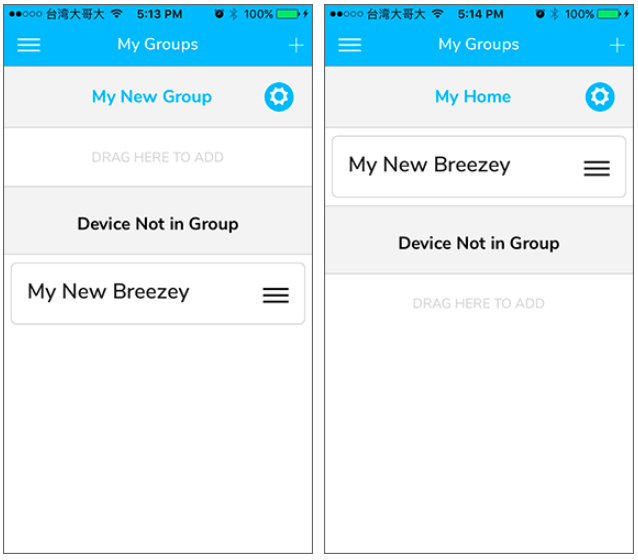
Creating and Managing My Groups
Groups are managed in the 'My Groups' section and stored under each user’s account.
My Groups - User with No Groups Example:
If the user has 1 or more groups added, a list of their devices and groups will display. The user can then drag and drop devices between groups to organize them.
Users can add up to 10 groups by clicking the top right plus button. When a new group is created, it will appear at the top with the default group name, "My New Group", and can be renamed by clicking on the settings icons.
My Groups - Moving Device Example:
Additional Screens
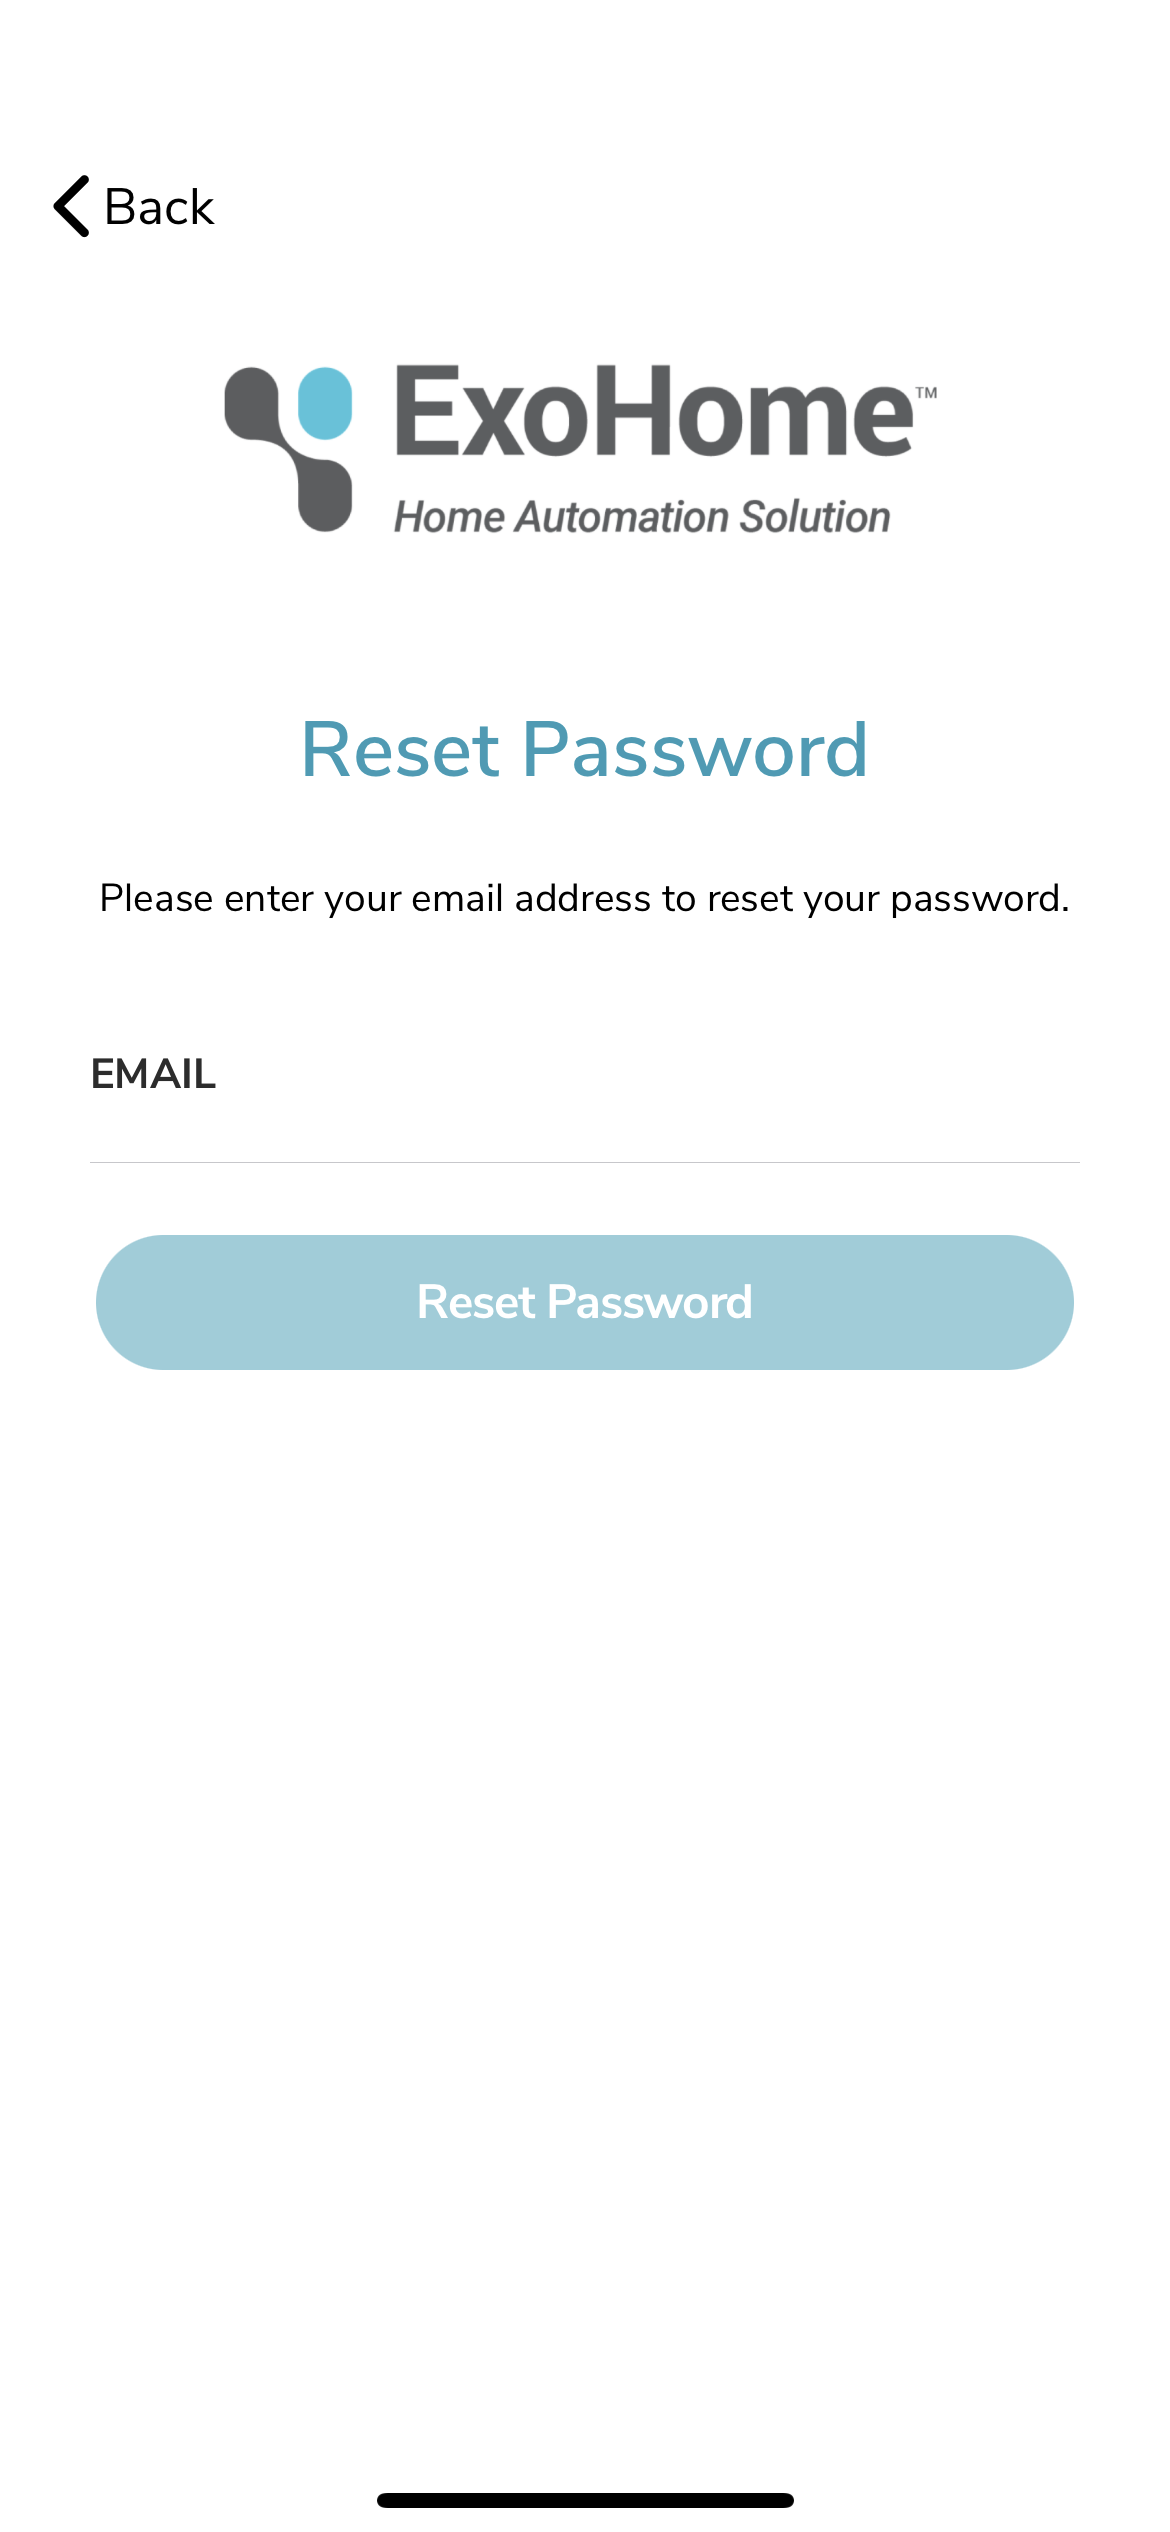
Logging Out and Signing In
The mobile application will try and keep users signed in, unless a user explicitly signs out or resets their account password from another device. Sometimes when app is updated, it requires users to log in again to ensure compatibility and security with the new version. In such a case, a user can sign back in from the 'Start' screen.
Log In Screen:
From the "Log In" screen, a user is also able to reset their password. This will send an email with a key to reset their password.
Reset Password Screen:
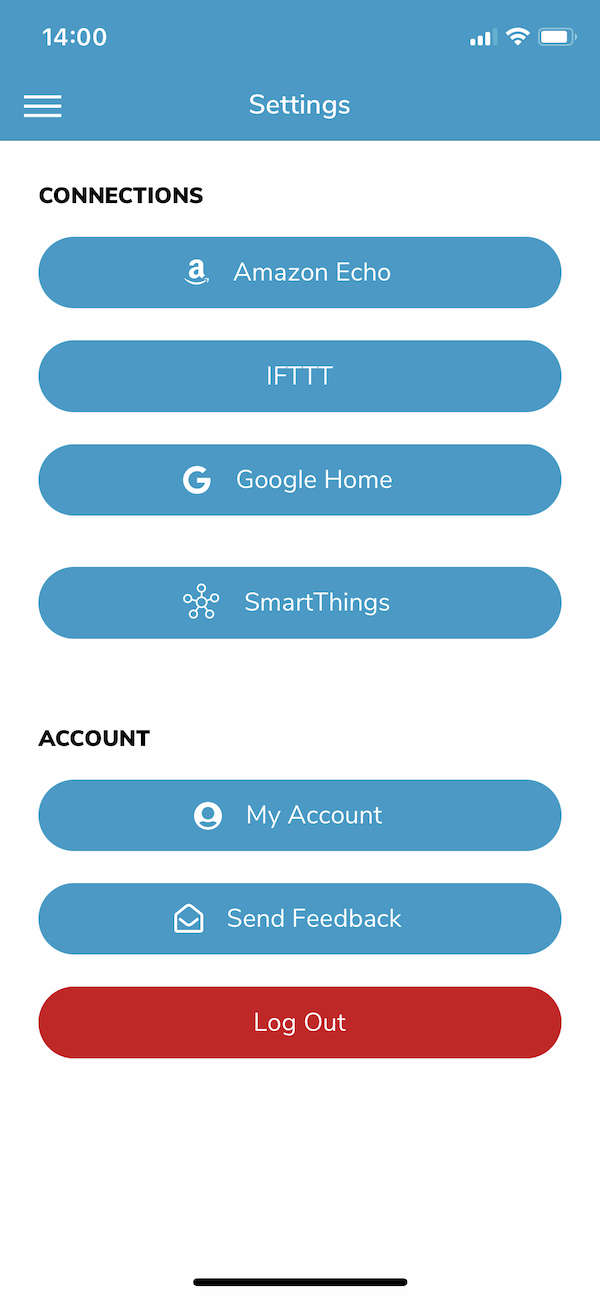
Work with Alexa/Google/IFTTT/SmartThings (Advanced Feature)
Users with Alexa, Google Assistant/Google Home, IFTTT, or SmartThings account are able to use these digital assistants/APPs with ExoHome APP. Just simply open your Alexa, Google Home, IFTTT, or SmartThings APPs and link the ExoHome account to add the devices provisioned in ExoHome.
This is the advanced feature provided by your home appliacne maker. The device types are also limited to its product offerings.
Using Shortcuts (iOS Only)
Apple mobile device users can add device control to iOS Shortcuts app, which can also interact with Siri.
When a device was provisioned, expand the control of the device and click "Shortcuts" at the bottom of the page. This shall bring you to the control items that you can add to the Shortcuts.
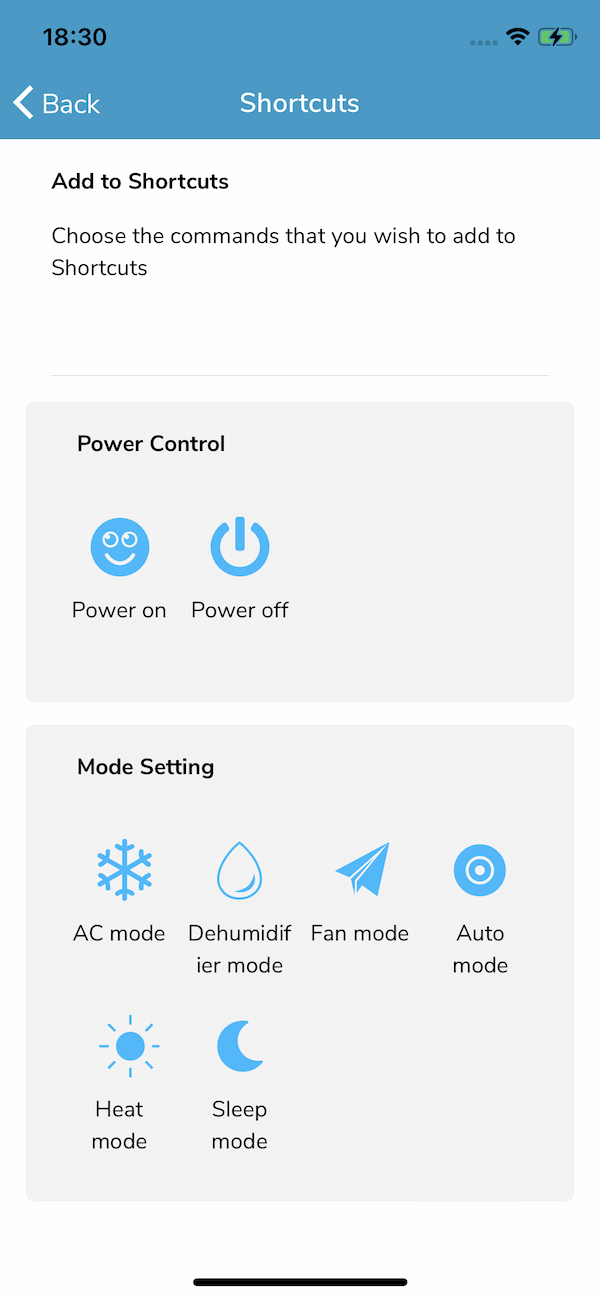
Click the icons then the Shortcuts setting would pop up. You may click "Done" or edit the utterance as you wish.
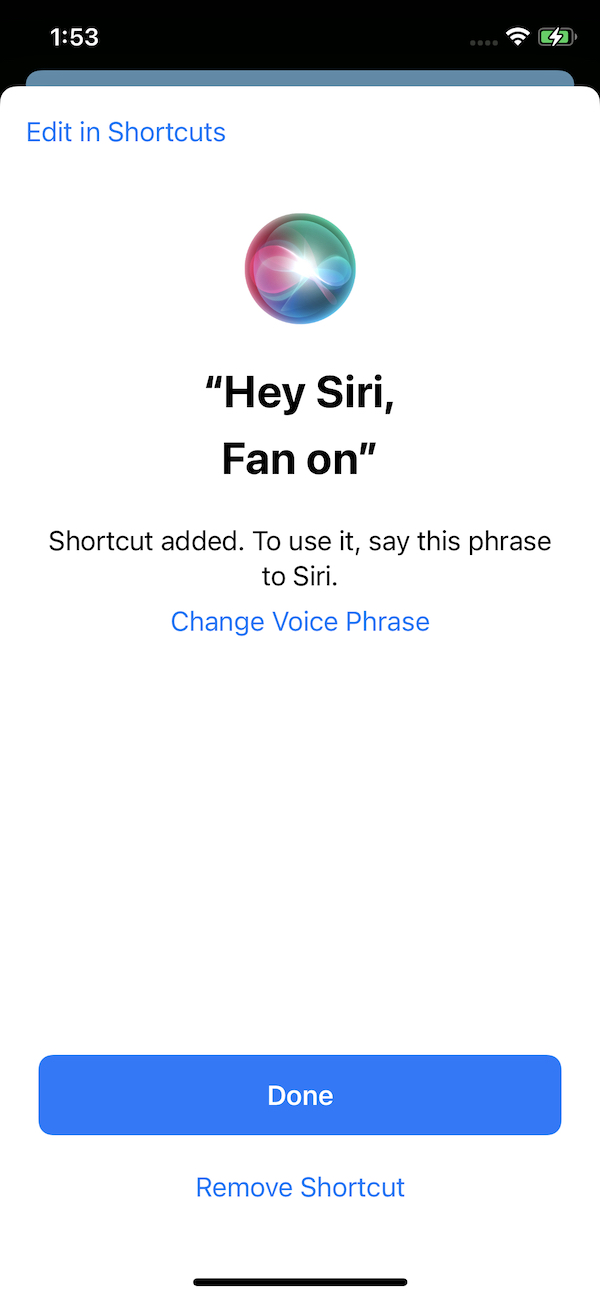
You may use voice commands by calling Siri with the utterance you set. Or you may open the Shortcuts APP and activate the control items.
This feature might only work when the home appliance maker has the control items pre-defined. Also, this function is supported by app layout style Popit List and Popit List with Image only.
For questions and more information on the ExoHome™, visit our support site.