Configuration of Your Mobile App
In this article, we will cover how to set up your Ionic project from the ExoHome™ app. You can download ExoHome™ SDK in the release note.
Prerequisite
Before you start building APPs, please have the following information at hand for the configuration.
- Domain name of your ExoHome instance (e.g., <your app>.apps.exosite.io)
- App ID (or bundle ID) of your mobile app (e.g., com.example.yourapp). For iOS, please register your app ID on Apple Developer > Identifiers.
- App Name of your mobile app (e.g., My App)
- App Url Scheme: Configured under your ExoHome Admin site’s "Theme → Email & Web" section (e.g., myproduct)
- Solution host: same as your domain name
- Product host: <productID.m2>.exosite.io:443. Please ask Exosite to provide
- Apple team ID
- Android debug keystore/release keystore files and parameters.
- (Optional) Facebook service ID (If Facebook login is enabled)
- (Optional) Facebook APP name (If Facebook login is enabled)
- (Optional) Facebook Client token (If Facebook login is enabled)
- (Optional) Firebase related files: If Push Notification and Google sign in are enabled, you need
google-services.json,.p8 APNs key, andGoogleService-Info.plistfiles. See Enabling Firebase Service and Enabling Google Account Login for settings.
Set Up Your App Environment For the First Time
Use env.sh file to speed up app configuration process if you just downloaded a new project SDK.
Go to ~/customer/common/ folder to find env.sh file. It allows you to complete app configuration in config.xml, package.json, and app.config.ts files at a time for once.
Warning
This env.sh file can be applied once only. If you wish to modify the setting afterwards, please skip this part and follow Modify Your App Configuration for app basic setting. In addition, you need to follow the other articles in ExoHome's App section for more configuration.
Please refer to the following info for what to put in the env.sh file.
- target_version: The ExoHome version you wish to build. (e.g.,
3.0.0). See release notes for the released versions. - home_page: You may customize layout on the mobile App page. (e.g.,
home/popit-list). A list of supported templates are in theenv.shfile for your reference. Find out more in Configuring Your Mobile App Pages. - application_host: Domain name of your ExoHome instance (e.g., <your app>.apps.exosite.io)
- product_host: <productID.m2>.exosite.io:443, ask Exosite to provide
- support_email: Your service contact email.
- app_scheme_name: Configured under your ExoHome Admin site’s "Theme → Email & Web" section (e.g., myproduct)
- app_widget_id: App ID of your mobile app (e.g., com.example.yourapp)
- app_name: App Name of your mobile app (e.g., My App)
- app_description: A short introduction of your App.
- app_author_name: Your company's name or App publisher name.
- app_author_email: You may leave it as it is (default is set your suppport_email) or change it to the publisher's email.
- display_product_name: Use the name that configured under your ExoHome Admin site’s "Theme → General Settings" section (e.g., Breezey).
- display_wifi_name: Use the name that configured under your ExoHome Admin site’s "Theme → App → Wi-Fi pattern name" (e.g., Breezey-xxxx).
- fb_service_id: Optional if you plan to use Facebook login, or leave it as it is.
- fb_app_name: Optional if you plan to use Facebook login, or leave it as it is.
- fb_client_token: Optional if you plan to use Facebook login.
- 3rd party login buttons: This is to enable/disable 3rd party login buttons like Facebook, Google, Apple on the login page.
- schedule_max: Define the maximum schedule can be added per device.
- generate_icon_splash: To generate app icon and splash page
- android_splash_screen_icon_background_color: To configure android splash screen icon's backgroud color (if the icon is transparent).
- android_splash_screen_background_color: To configure android splash screen background color.
- build_type: To define if you want to build debug app or release app.
- team_id: Please put your Apple developer team ID.
- android build related: To build debug/release version of android app, you need to have debug.keystore/release.keystore's file info with you. See Build Android App for generating keystore file(s).
   #---------------------------------------------------------------------
   # Start of Configuration
   #---------------------------------------------------------------------
   # set the app version
   target_version="3.0.0"

   #set the home page
   home_page="home/popit-list"
   # home_page="home/single-accordion"
   # home_page="home/large-list"
   # home_page="home/medium-list"
   # home_page="home/small-list"
   # home_page="home/large-grid"
   # home_page="home/medium-grid"
   # home_page="home/small-grid"

   # ApplicationSubDomainName
   application_host="<your app>.apps.exosite.io"

   # ProductId
   product_host="<productID>.m2.exosite.io:443"

   # SupportEmail
   support_email="support@example.com"

   # AppSchemeName
   app_scheme_name="myProduct"

   # AppWidgetId
   app_widget_id="com.example.yourapp"

   # AppName
   app_name="My App"

   # AppName
   app_description="your App description can be put here"

   # AppAuthorName
   app_author_name="<author name>"

   # AppAuthorEmail
   app_author_email=${support_email}

   # DisplayProductName
   display_product_name="<please input the name>"

   # DisplayWifiName
   display_wifi_name="<same as above>-XXXX"

   # FacebookServiceId
   fb_service_id="<please input the APP ID>"

   # FacebookAppName
   fb_app_name="<please input the app name>"

   # FacebookClientToken
   fb_client_token="my-facebook-client-token"

   # Enable/Disable OAuth login buttons(Solution ENV has piority).
   signin_method_facebook="true"
   signin_method_google="true"
   signin_method_apple="true"

   # Schedule Max in device schedule page.
   schedule_max="10"

   # If adding new icon or splash pictures, set true to regenerate.
   generate_icon_splash="false"

   # For Android splash screen only adopted if the icon has transparent background.
   android_splash_screen_icon_background_color="#ffffff"

   # For Android whole splash screen background color.
   android_splash_screen_background_color="#ffffff"

   # If no need notification and google login. set to true. If need either, set to false.
   # If ture, signin_method_google will be set to false automatically (please do not modify this one now).
   remove_firebase_package="false"

   # Choose build type debug or release.
   build_type="debug"

   # For iOS build in build.json. Both debug and release build.
   team_id="TEAM_ID"

   # For Android debug build in build.json. Need to match debug.keystore params.
   build_json_android_debug_store_password="android"
   build_json_android_debug_alias="androiddebugkey"
   build_json_android_debug_password="android"

   # For Android release build in build.json. Need to match release.keystore params.
   build_json_android_release_store_password=""
   build_json_android_release_alias=""
   build_json_android_release_password=""
Apply the settings by using this command:
sh customer/apply_env_script.sh
Note
After applying this env.sh, if you still need to modify the settings, you should refer to the individual settings mentioned in other articles.
Modify Your App Configuration
Set Up App ID and App Name
Every app has an App ID, to uniquely identify your app on a device or publishing store, and an App Name, the display name shown to your end-users. You should choose a name and id unique to your application.
Note
You can always update this later, before publishing.
Steps
-
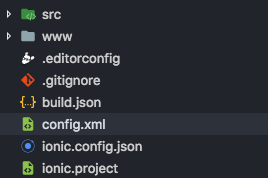
Open "config.xml", under the hamv_mobile folder.
-
Change your App ID, App Name, and make sure the
versionCode(must be a unique number like timestamp),versionName,version(same as versionName),description, and author info are correct. Shown as below red boxes. Note that App ID is interchangeably with Package Name for Android and Bundle ID for iOS.
Important notice about "config.xml" and "package.json"
__
Once you install a platform in the "Running the App" tutorial, any time you change your "config.xml" or "package.json", you need to do the following remove commands and then reinstall the dependencies and platforms.
__
1. Remove node_modules, plugins and platforms
cd hamv_mobile
rm -rf node_modules
rm -rf plugins
rm -rf platforms
2. Remove platform
ionic cordova platform rm android
ionic cordova platform rm ios
3. Reinstall project dependencies
npm install
Set Up Deep Links
To seamlessly redirect users to your installed app from another location, such as the welcome or reset password landing pages, follow the provided steps. Redirecting to the app will not work without setup.
Note 1
You can always update this later, before publishing.
Note 2
Please make sure you change the deep links and don't use the default ones.
- Open "package.json".
- Change your URL_SCHEME and DEEPLINK_HOST in your "package.json".
The URL_SCHEME should match the App Url Scheme under your Admin site "Theme" section.
The DEEPLINK_HOST should match your domain URL that Exosite provided.
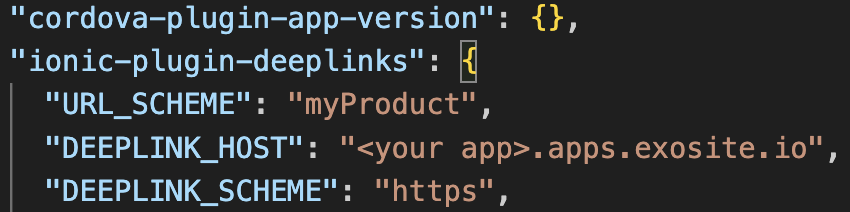
Note
Scheme and host name matching in the Android framework is case-sensitive, unlike the RFC. As a result, you should always specify schemes using lowercase letters. See Android - Data Element
References
Set Up Solution Host and Product Host
Steps
-
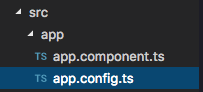
Open "app.config.ts", under hamv_mobile/src/app/.
-
Under the
export const appConfig: AppConfigpart, change your solutionHost, shown as "solutionId.apps.exosite.io" by default. Replace the value to: <your app>.apps.exosite.io. -
Under the
export const appConfig: AppConfigpart, change your productHost, shown as "productId.m2.exosite.io:443" by default. Replace the value to the one Exosite provided.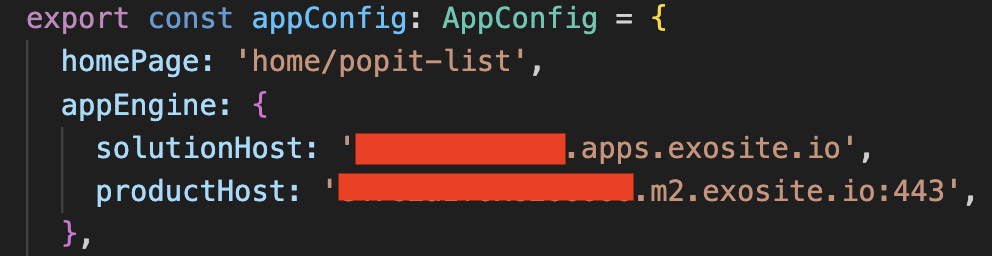
Set Up Login Icons
- Open
app.config.tsfile, under ~/src/app/. - Modify the
signinMethodvalue totrueto show login icons;falseto hide login icons.
Now, you are ready to proceed to the build app process.
Have more questions? Submit a request